
Pinpoint Switch Modification
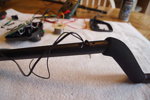
This modification corrects an intermittent problem with defective pinpoint switches on the Bounty Hunter Land Ranger Pro metal detectors.
Youtube video
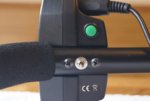
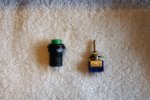
My mod adds two switches to add to the versatility of using your detector in pinpoint mode. You do not need both switches. You can install one or both. One switch is an on/off SPST latching push button switch. The other switch is an on/off/on SPDT miniature toggle switch. This switch is nice because it can be pushed forward to pinpoint or pulled back to pinpoint. Center position is off. The toggle switch or the push button switch can be used to lock the pinpoint to the on position. Also, the original pinpoint switch on front of detector can be utilized as well if one chooses to.
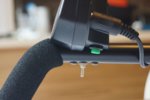
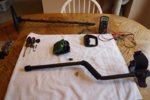
First steps are to disassembly detector. Cut a small rectangular hole into top of metal shaft where control box screws onto shaft. This is to accommodate putting toggle switch inside shaft pole. Then drill small hole on opposite side to push toggle switch into.
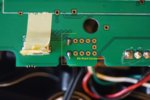
For the push button switch, drill a hole on bottom of control box. Next drill a small hole on an angle on back of control box (near screw holes) to pull wires from toggle switch (inside pole) inside the control head. Do not drill straight back or you will go directly into battery box. All holes drilled will be hidden when metal detector is reassembled. (If you are careful and plan your wiring thoughtfully.) See pictures.
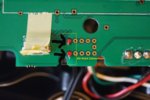
You should probably check your switches with a continuity meter to make sure they work before you install them. You would hate to find out that a switch was defective after you solder and installed everything.
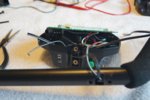
Make final wire connections and solder. Excess wire can be pushed inside pole shaft or in control box. Test and enjoy.
Remember, either the original pinpoint, the toggle, or the push button switch can be used. I personally like the idea of having the pinpoint to be able to remain on if I choose to do so. I think you will find the addition of the modifications a worth will project. In actual use, I like both the toggle and the new push button switches. I find both are very versatile and add a better metal detecting experience. Of course, you do not need both switches. You could do the mod with either or both.
Credit goes to Joel Bryant for inspiring me to mod my detector. Thanks.
Anyone interested in me modding your detector, please feel free to private message me.
[IMG alt="Click image for larger version.
Name: Pic 2.jpg
Views: 234
Size: 258.7 KB
ID: 1442380"]http://www.treasurenet.com/forums/a...ntid=1442380&stc=1&thumb=1&d=1492811722[/IMG][IMG alt="Click image for larger version.
Name: pic 3.jpg
Views: 307
Size: 413.1 KB
ID: 1442381"]http://www.treasurenet.com/forums/a...ntid=1442381&stc=1&thumb=1&d=1492811723[/IMG][IMG alt="Click image for larger version.
Name: pic 5.jpg
Views: 351
Size: 356.2 KB
ID: 1442383"]http://www.treasurenet.com/forums/a...ntid=1442383&stc=1&thumb=1&d=1492811724[/IMG][IMG alt="Click image for larger version.
Name: DSC03939.JPG
Views: 214
Size: 4.81 MB
ID: 1442387"]http://www.treasurenet.com/forums/a...ntid=1442387&stc=1&thumb=1&d=1492811808[/IMG][IMG alt="Click image for larger version.
Name: pic 6.jpg
Views: 219
Size: 211.3 KB
ID: 1442384"]http://www.treasurenet.com/forums/a...ntid=1442384&stc=1&thumb=1&d=1492811725[/IMG][IMG alt="Click image for larger version.
Name: pic 7.jpg
Views: 238
Size: 477.5 KB
ID: 1442385"]http://www.treasurenet.com/forums/a...ntid=1442385&stc=1&thumb=1&d=1492811725[/IMG][IMG alt="Click image for larger version.
Name: pic1.jpg
Views: 209
Size: 406.8 KB
ID: 1442386"]http://www.treasurenet.com/forums/a...ntid=1442386&stc=1&thumb=1&d=1492811726[/IMG][IMG alt="Click image for larger version.
Name: DSC03944.jpg
Views: 234
Size: 1.25 MB
ID: 1442388"]http://www.treasurenet.com/forums/a...ntid=1442388&stc=1&thumb=1&d=1492811813[/IMG][IMG alt="Click image for larger version.
Name: DSC03951.jpg
Views: 324
Size: 1.68 MB
ID: 1442389"]http://www.treasurenet.com/forums/a...ntid=1442389&stc=1&thumb=1&d=1492811822[/IMG][IMG alt="Click image for larger version.
Name: Rectangular Hole Cut.jpg
Views: 242
Size: 3.81 MB
ID: 1442390"]http://www.treasurenet.com/forums/a...ntid=1442390&stc=1&thumb=1&d=1492811830[/IMG]
This modification corrects an intermittent problem with defective pinpoint switches on the Bounty Hunter Land Ranger Pro metal detectors.
Youtube video
My mod adds two switches to add to the versatility of using your detector in pinpoint mode. You do not need both switches. You can install one or both. One switch is an on/off SPST latching push button switch. The other switch is an on/off/on SPDT miniature toggle switch. This switch is nice because it can be pushed forward to pinpoint or pulled back to pinpoint. Center position is off. The toggle switch or the push button switch can be used to lock the pinpoint to the on position. Also, the original pinpoint switch on front of detector can be utilized as well if one chooses to.
First steps are to disassembly detector. Cut a small rectangular hole into top of metal shaft where control box screws onto shaft. This is to accommodate putting toggle switch inside shaft pole. Then drill small hole on opposite side to push toggle switch into.
For the push button switch, drill a hole on bottom of control box. Next drill a small hole on an angle on back of control box (near screw holes) to pull wires from toggle switch (inside pole) inside the control head. Do not drill straight back or you will go directly into battery box. All holes drilled will be hidden when metal detector is reassembled. (If you are careful and plan your wiring thoughtfully.) See pictures.
You should probably check your switches with a continuity meter to make sure they work before you install them. You would hate to find out that a switch was defective after you solder and installed everything.
Make final wire connections and solder. Excess wire can be pushed inside pole shaft or in control box. Test and enjoy.
Remember, either the original pinpoint, the toggle, or the push button switch can be used. I personally like the idea of having the pinpoint to be able to remain on if I choose to do so. I think you will find the addition of the modifications a worth will project. In actual use, I like both the toggle and the new push button switches. I find both are very versatile and add a better metal detecting experience. Of course, you do not need both switches. You could do the mod with either or both.
Credit goes to Joel Bryant for inspiring me to mod my detector. Thanks.
Anyone interested in me modding your detector, please feel free to private message me.
[IMG alt="Click image for larger version.
Name: Pic 2.jpg
Views: 234
Size: 258.7 KB
ID: 1442380"]http://www.treasurenet.com/forums/a...ntid=1442380&stc=1&thumb=1&d=1492811722[/IMG][IMG alt="Click image for larger version.
Name: pic 3.jpg
Views: 307
Size: 413.1 KB
ID: 1442381"]http://www.treasurenet.com/forums/a...ntid=1442381&stc=1&thumb=1&d=1492811723[/IMG][IMG alt="Click image for larger version.
Name: pic 5.jpg
Views: 351
Size: 356.2 KB
ID: 1442383"]http://www.treasurenet.com/forums/a...ntid=1442383&stc=1&thumb=1&d=1492811724[/IMG][IMG alt="Click image for larger version.
Name: DSC03939.JPG
Views: 214
Size: 4.81 MB
ID: 1442387"]http://www.treasurenet.com/forums/a...ntid=1442387&stc=1&thumb=1&d=1492811808[/IMG][IMG alt="Click image for larger version.
Name: pic 6.jpg
Views: 219
Size: 211.3 KB
ID: 1442384"]http://www.treasurenet.com/forums/a...ntid=1442384&stc=1&thumb=1&d=1492811725[/IMG][IMG alt="Click image for larger version.
Name: pic 7.jpg
Views: 238
Size: 477.5 KB
ID: 1442385"]http://www.treasurenet.com/forums/a...ntid=1442385&stc=1&thumb=1&d=1492811725[/IMG][IMG alt="Click image for larger version.
Name: pic1.jpg
Views: 209
Size: 406.8 KB
ID: 1442386"]http://www.treasurenet.com/forums/a...ntid=1442386&stc=1&thumb=1&d=1492811726[/IMG][IMG alt="Click image for larger version.
Name: DSC03944.jpg
Views: 234
Size: 1.25 MB
ID: 1442388"]http://www.treasurenet.com/forums/a...ntid=1442388&stc=1&thumb=1&d=1492811813[/IMG][IMG alt="Click image for larger version.
Name: DSC03951.jpg
Views: 324
Size: 1.68 MB
ID: 1442389"]http://www.treasurenet.com/forums/a...ntid=1442389&stc=1&thumb=1&d=1492811822[/IMG][IMG alt="Click image for larger version.
Name: Rectangular Hole Cut.jpg
Views: 242
Size: 3.81 MB
ID: 1442390"]http://www.treasurenet.com/forums/a...ntid=1442390&stc=1&thumb=1&d=1492811830[/IMG]
Attachments
-
DSC03939.jpg4.8 MB · Views: 385
-
 DSC03944.jpg19.3 KB · Views: 375
 -
DSC03951.jpg1.7 MB · Views: 362
-
 Pic 2.jpg258.7 KB · Views: 349
 -
 pic 3.jpg312.3 KB · Views: 395
 -
 pic 5.jpg356.2 KB · Views: 427
 -
 pic 6.jpg211.3 KB · Views: 350
 -
 pic 7.jpg477.5 KB · Views: 343
 -
 pic1.jpg66.8 KB · Views: 384
 -
 PinPoint.jpg41.2 KB · Views: 395