Find's Treasure Forums

Welcome to Find's Treasure Forums, Guests!

You are viewing this forums as a guest which limits you to read only status.

Only registered members may post stories, questions, classifieds, reply to other posts, contact other members using built in messaging and use many other features found on these forums.

Why not register and join us today? It's free! (We don't share your email addresses with anyone.) We keep email addresses of our users to protect them and others from bad people posting things they shouldn't.

Click here to register!


Need Support Help?

Cannot log in?, click here to have new password emailed to you

Changed email? Forgot to update your account with new email address? Need assistance with something else?, click here to go to Find's Support Form and fill out the form.

Almost completed Explorer 2 chestmount mod.

Dan(NM)

Well-known member
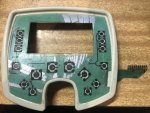
Since I'm down and out with a broken ankle for a few weeks and have plenty of time on my hands. I decided to do a EX2 chest mount mod that I saw on You-Tube by IDX Monster, thank you sir for paving the way!! I have a bum shoulder that needs to be rebuilt next year, I needed to adapt my machine to extend my hunting time until then. I used a Teknetics S-rod for the stock 11" coil and a White's MX5 S-rod for the 8" coil.
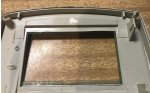
I'll be using a Go-Pro chesty to mount the control head and I bought a 3' extension cable to connect the control to the coil. I cut the battery housing from the handle, but, I have a more compact and lighter battery pack on the way. I ordered a 1/4" stereo headphone jack from Amazon and will run my phone cord under my shirt to keep it from getting in the way.
This set-up is as light as feather to swing and I can't wait to heal up and take it on it's maiden voyage.
 
Exactly as I have mine mounted Dan, you’ll have SO much fun. I can’t wait to see how many get chopped up....I know of 3 already!
 
IDXMonster said:
Exactly as I have mine mounted Dan, you’ll have SO much fun. I can’t wait to see how many get chopped up....I know of 3 already!

I have another one I just picked up for a backup if this one pukes on me. I went ahead and bought 2 of everything I need if and when the times comes. I will more than likely try and grab 1 more for good measure ;)
 
Looking good, best of luck.

My Explorer II is a tan color and I am wondering why yours is black?

Tony N J
 
BigTony said:
Looking good, best of luck.

My Explorer II is a tan color and I am wondering why yours is black?

Tony N J
. Somebody painted it. Not sure why, but, they did.
 
It does look better then the original color.
Good luck with the mod, I wish I had that motivation to do mine.
I gave away my backup Exp II but still have mine because I love the smart screen

Tony NJ
 
Chest mounting the screen is the best. Had mine for years, still got it and I can attest to it being the best for land and water...

Take it a step further and you can make mount a trigger button for Pin Point and a second button for Iron Mask as well..

All the best with that.

David Di

https://www.findmall.com/read.php?19,1379874,1379924#msg-1379924
 
david.di said:
Chest mounting the screen is the best. Had mine for years, still got it and I can attest to it being the best for land and water...

Take it a step further and you can make mount a trigger button for Pin Point and a second button for Iron Mask as well..

All the best with that.

David Di

https://www.findmall.com/read.php?19,1379874,1379924#msg-1379924

That’s awesome that people have done this before David. SO many people have walked away because of the weight, THIS type of rig puts the Explorers right back in the game, exactly where they should be. Glad you posted this...
 
For me, the Explorer/Etrac control box was best placed on the chest. It saved me using my reading spectacles that I would wear in order to see the screen though the Explorer's audio also proved so useful. Doing the modification was for a perceived necessity and gave me no real advantage other than convenience.
Chest mounting It also preserved the integrity of the detector's internal 3 pcb's connected to each other.with those needle like pin connectors , that would sometimes fail if you dropped the Explorers or subject them to heat and sometimes not many, just a few, for no apparent reason would develop unknown weird problems.This not so much on Explorer 2 or Explorer SE but also seemed that sometimes oxidation at those same pin connections were also a contributing factor (sometimes sorted by unplugging and then plugging back together any of the internal board and cable connectors..This was certainly not so much on the Etrac, as it had improvements done on the way the internal boards were supported and the use of less pcbs, that I could see after looking inside, with the issue of pcb separation.factor.

Also using the Explorer control box was a lot easier for me and looks like for Dan(NM) realizes that, rather than trying to re house and make another control box as the original control box can be made to be water resistant with only a small amount of of well placed polyurethane or silicone sealant

Does anyone remember the modification that housed the control box inside a clear acrylic box , for chest mounting, and used magnetic reed switches for all it's functions. Done some 20 years ago by who. It's the one that.inspired me.

Looking to maybe one day, MAYBE chest mount CTX3030m though my Equinox 800 has covered a lot of bases that sees me detecting more often rather than modding anything.

Life's too short for the what if's.

David Di.
.
 
Chest mounting the screen is the best. Had mine for years, still got it and I can attest to it being the best for land and water...

Take it a step further and you can make mount a trigger button for Pin Point and a second button for Iron Mask as well..

All the best with that.

David Di

David.Could you elaborate on those Function Buttons? I recently lost my "Menu" Button,it does not work.Is there some way of "Hot Wiring" those Buttons,so as to be able to get into my Menu Settings.Basically If I could at least get in and put a few settings in.Like,I really Loved the Ferrous Setting.When the Button quit on me,out of desperation to get it to work,I did a Factory Reset,and lost my special settings.Thanks.
 
David.Could you elaborate on those Function Buttons? I recently lost my "Menu" Button,it does not work.Is there some way of "Hot Wiring" those Buttons,so as to be able to get into my Menu Settings.Basically If I could at least get in and put a few settings in.Like,I really Loved the Ferrous Setting.When the Button quit on me,out of desperation to get it to work,I did a Factory Reset,and lost my special settings.Thanks.

Hi stoneshirt,

You may need to replace the control panel entirely. I think that it’s easiest and best solution if you are not aware how to modify or repair. New control panels for the Explorer are available for sale on line. It's a realtively easy process of remving an replacing it.

Naturally enough you'll need to dismantle the control box by taking the control panel off.
The control panel facia has the 4 screw stubs that are prone to cracking over time or for what ever other reason including the removal of the 4 screws. Just be aware of that.
An example:

IMG_1513.jpg


The buttons off the control panel are small conductive metal domes on what is basically a printed circuit board. This is a pcture that has had the control panel mylar removed(15 years ago). The black parts are conductive "printed on" circuit tracks that the button domes connect when they are depressed.

IMG_1512.jpg


All merge to a flat ribbon cable that slots into one the boards of the Explorer.
I suggest you first check that this ribbon cable is making a postve connection to the PCB by removing it and re connecting it.
It may be the problem why the MENU button won't work but if it's not then the spring in that dome of the button is gone.

If you need to create an alternative MENU switch, that to can be done but it may not be as slick and easy as what a new control panel offers.

From my memory, one of the connections on the ribbon is common and the others are for the relevant functions. You can I find out what each connection represents using a multi-meter to test continuity or another continuity test of each individual connecter by pushing the buttons. On the separated from the PCB control panel ribbon. With the knowledge of what each connector is, I soldered direct to the PCB of the ribbon connector on the board that this ribbon connects to achieve a remote pinpoint and iron mask switch. It’s not difficult to do and I dare say it’s possible to bypass ALL the switches and create a new control panel of switches that can be used to operate the Explorer’s electronics.

Hope this helps

Best of luck whatever you decide.

Davide Di Prospero
 

Attachments

  • IMG_1512.jpg
    IMG_1512.jpg
    83.5 KB · Views: 232
  • IMG_1513.jpg
    IMG_1513.jpg
    54.4 KB · Views: 235
Last edited:
Top