Find's Treasure Forums
Welcome to Find's Treasure Forums, Guests!
You are viewing this forums as a guest which limits you to read only status.
Only registered members may post stories, questions, classifieds, reply to other posts, contact other members using built in messaging and use many other features found on these forums.
Why not register and join us today? It's free! (We don't share your email addresses with anyone.) We keep email addresses of our users to protect them and others from bad people posting things they shouldn't.
Click here to register!
Need Support Help?
Cannot log in?, click here to have new password emailed to you
You are using an out of date browser. It may not display this or other websites correctly.
You should upgrade or use an alternative browser.
You should upgrade or use an alternative browser.
Program I have been using
- Thread starter JohnTN
- Start date
GraveDiggerMax-VaBch-Va
New member
n/t
GraveDiggerMax-VaBch-Va
New member
why do u have the top right corner blacked out
max
max
Following on from a Private message from max on the Minelabowners web site asking for my opinion on johns set up. Its very much the same set up as a lot of us use in the UK. We dont bother with the small blacked out area top right of the screen. I hadn't noticed that when max first mentioned it. The only other difference I can see in Johns set up to the one I use is hes got the gain maxed out at 30 whereas we tend to stick around 24-26. I also prefer to use Pitch hold or Smooth response over normal while using variable tones and conduct here in the UK, because with a set up like that we get a lovely little grunty low signal on the silver medieval hammered coins we love to find and the same on small bronze Roman coins that are plentiful on some of our fields. Both these types of coins take some finding at times so we detect very slow & low and listen for the faintest little signal that might give their presence away. The above set up that John has posted is excellent for coin hunting on plowed or grassland.
Turn the E Trac on and go to the Quick mask screen.
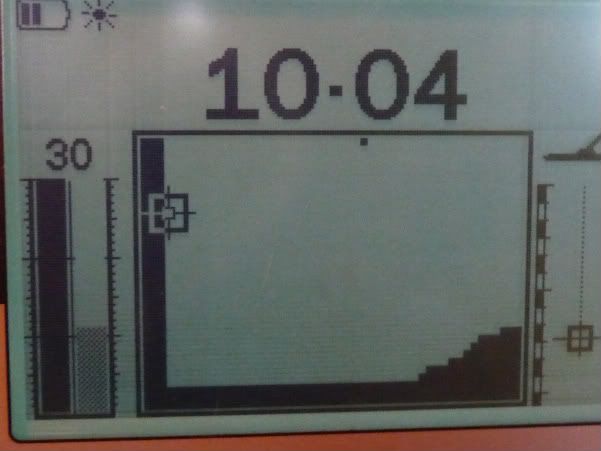
With the Navigation buttons toggle the ferrous reading up to say 33 ( full open is 35) and the Conduct reading on the left at zero, or alternatively to start with at 1 or 2 ( any higher runs the risk of losing small hammered cuts or whole)
I have now combined the quick mask screen with a simple nails reject pattern in the bottom right hand corner of the screen (see photo below)
Hit the detect button and the screen will ask wether you want to load this screen into the smartfind one, press yes.
Go into menu next and scroll through the headings to Sensitivity. mines set as
Sensitivity.......Manual
Manual level.... 27 (set this to suit conditions)
Auto level..... +3 (incase you use auto)
Go along to next stage in menu which is Audio.
Threshold level... Just Audible
Volume limit......30
Volume gain......24 (or less. No higher)
Response.......Pitch hold. (or one of the others if you prefer).
Go into the Tone ID settings and choose to suit
No Tones........multi
Sounds...........conduct (ferrous if you prefer)
Variability....... 30
Limits............ 30
Threshold pitch...1
Go along to next stage which is Expert.
Recovery deep...on
Recovery fast.....off
Trash density....Low (or high to suit conditions)
Ground.......Difficult (or neutral )
Noise cancel......2 or choose 1-10
Go along to next stage which is Preferences.
Contrast........15
Pinpoint mode...Normal (or sizing)
Show sensitivity...On
Show mode info...On
Display timeout...Off or On to suit.
My choice of response is Pitch hold because I love the way it grabs signals and holds them until you go over something else. It also gives a nice two way signal same as Normal. I do use smooth response but only if the ground is good. I'm not into too much noise. Have never personally used the Long setting so can't comment.
I am finding the above settings suit most of the field types I detect on. The only setting I alter is sensitivity to keep things quiet and stable.
The main Quickmask screen can be easily altered in the field to suit the amount of ferrous and conduct you want to knock out.
Conduct line on the screen is the only one I havent settled on yet. Im still digging an annoying amount of silver paper / foil which I would like to reject but I dont want to risk losing cut qtrs & halves of hammered which come in very close by.
Up to now Ive dug little or no iron with these settings. With the new dual screen showing either digital or smart screen top or bottom and the smallness of the crosshairs Im finding Im using the variable tones more and watching the digital numbers & cross hair less. I am digging every good stable two way signal.
The digital readout can be a bit confusing especially for a new owner. Most coins and artefacts are coming in at a ferrous value of 12 out of the ground with the E trac but a lot of signals where the target is still in the ground are showing at totally different values to start with. This is all determined by the way the target is laying in the soil or wether its sat near some Iron or trash. Approaching the signal from a different angle or even sweeping fast or slow can change the digital values totally.
If in doubt and its a good two way signal, Dig It. Hope this helps some of the confused newcomers.
For anybody more experienced and can detect through the noise barrier Keep all the settings above but use Smooth response and maybe max out sensitivity, this will put you into Slow & Lows set up. Very Happy The only thing you will need to use the last set up is a good pair of headphones with volume control on them to turn the background noise right down. Very Happy Very Happy
Its early days yet and we might alter things a bit, later on. Below is a picture of the Screen I made up using my nails pattern combined with a quick mask screen. I basically use this for all my detecting with the E Trac because it suits our style of detecting in the UK. Wide open and very little discrim pattern.
I made the post quoted below in open forum recently and was asked to post it in this E Trac programme section to help throw some light on things for newcomers who might be having problems understanding things.
"Major problem for new E Trac owners is the manual is trying to cope with all sorts of levels of Knowledge and dare I say Intelligence. A good starting point is the Minelab factory preset mode and I would recommend any new owner to stay in that until they work out what all the settings do.
I have just looked at all the factory presets in the table at the back of the handbook and I would be perfectly happy to stay and detect and feel confident that I wouldnt miss much in any of those modes and would recommend any newcomers to do the same.
Everybody's going on about the threshold level being too high at 30. That is the factory preset level and its right in the middle of the scale 1 - 50. It is not too high for normal detecting if not using headphones, when using headphones it can be lowered to say around 15-20 where its just audible. Its there for a reason. If you couldnt hear that hum in the background how are you going to know when your sensitivity is too high. Also when your hum disappears momentarily it means you have just gone over a target thats being rejected. Its telling you all sorts that you need to know
When your sensitivity is set too high your threshold hum starts breaking up and you might even lose it totally. When this happens lower your manual sensitivity until the threshold hum comes back.
THE NEXT STEP TO MAKING YOUR OWN PATTERN UP.
My advice for a newcomer to the E Trac and the next obvious and sensible step after the Factory preset modes is to forget all about preset programmes from other sources even though it might seem a good idea to copy everybody elses because they might have been succesful once with it and found some hammered or staters. Go straight to the Quick mask screen and make your own to suit your style of detecting.
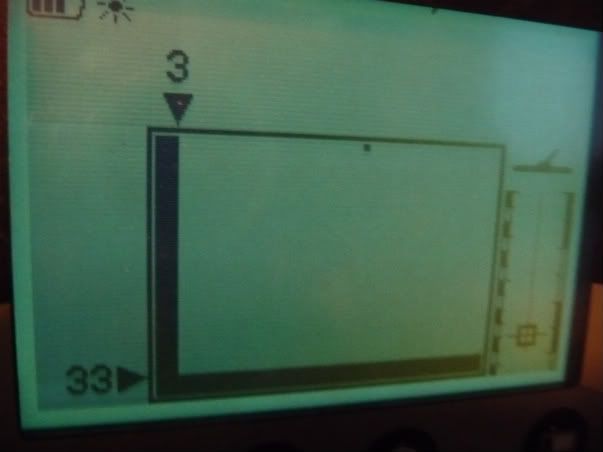
Press the quick mask button on the screen and you will be presented with a clear screen.
Next step decide what level of Ferrous and Conduct screening you want.
Using the navigation arrows on the bottom left start by pressing the right facing arrow three times. This will give you a conduct discrim reading of 3 on the left hand side. You can enter more or less than this but remember small hammered coins start showing from this point onwards. Under 3 will be mostly silver foil.
Next press the up arrow which will start raising the Ferrous black line. I have mine set on 33 which is two presses up from the bottom, the higher you go the more Iron and then good targets you will shut out so be careful. The lower you go the more Iron you will dig so a happy medium needs to be found.
Once you have the screen you want to use press the detect button and the screen will ask you if you want to load this quickmask screen into smart find, say ok.
Now this can be the base screen that you always use and can be also saved away as one of your modes. If you end your detecting session and turn off that screen it will be there again when you restart the next time.
As an addition to the above screen I have incorporated a small nails reject pattern into the corner of my quick mask screen that I made above. This is how I did it.
Once I had made the quick mask screen and pressed the detect button and answered yes to wether I wanted to use it as my Smartfind screen I then went back into the menu under discrimination and scrolled down to SAVE where I placed it into one of the my pattern modes by clicking on the right or left arrow to make it save, I then clicked detect to go back to the main screen.
Deciding I was happy with it I then went back to the discrimination Menu and scrolled down to Edit, this brought up the screen below
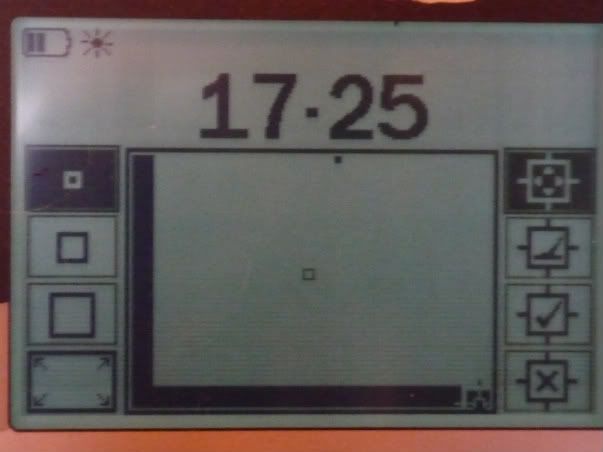
From the picture you can see that the top two boxes either side are hilighted black, these are the two modes to use, the one on the left is the small cursor the box on the right is the manual mode which lets you scroll around the screen.
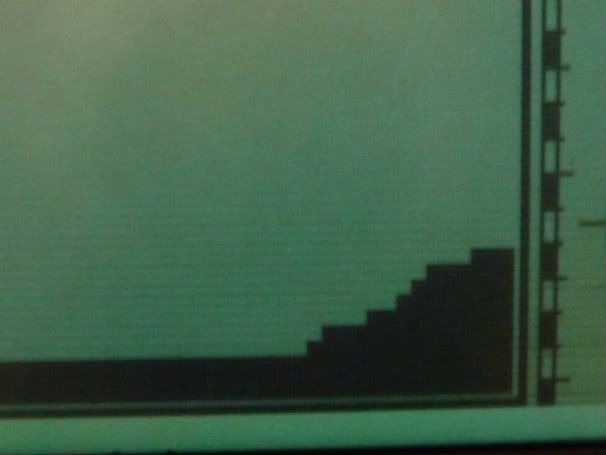
The next stage is to manoever the small cursor down to the bottom right hand corner to begin making your nails pattern. This is where a little bit of practise and playing around comes in. With the cursor in the position where you want to start colouring in your screen press in the accept / reject button and you will notice that one click makes a small black square the next click removes it. By holding this button in while you move the appropriate navigation arrow you can proceed to quickly fill part of a line in with black squares.
By looking at my photo below you can work out roughly how high and how wide this nails reject pattern needs to be or as near as anyway.
Gordon Heritage actually made this nails pattern for me the first day I got my E Trac at the Wantage on Mud rally, thanks mate.
Once you have the screen looking similar to the one in the photo above click Detect button and you will be asked do you want to use it in the smartfind screen, click yes and detect.
You can then return to the Discrim menu and scroll down to save where you can then enter it into another my pattern screen and save it away as before by clicking the right or left navigation arrow. Once saved you can return and detect by simply pressing detect.
When you turn off the E Trac in this mode you will always return to it when you turn on again.
If you lose it you can always find it again in my patterns.
Another little tip, before saving these screens in my patterns make sure that all your other settings are as you want to save them away with that particular pattern.
The finished screen
The next stage for an owner progressing from factory presets is to run through the menu and decide what you want to change things to.
You have your quick mask detecting screen as a base so you want to change each setting in turn.
Sensitivity mode Auto or manual, they are both good. sometimes when the E Trac is unstable I will switch to Auto. you can choose the level of auto you want by pressing the navigation button up or down, It will change the values from +3 to -3, I usually leave mine on +3. Manual sensitivity is the normal way to go probably. this needs setting so that you keep things stable, the threshold hum helps to determine this. I usually try and set mine between 25 and 30 max.
Audio.
The settings below are aimed at giving Variable tone settings so that signals from left to right on the screen start low and rise progressively to a higher pitch. To understand what things sound like lay out a series of coins of different values and types plus some pieces of iron & other bits and bobs.
Threshold Level. Just audible around 15-20
Volume limit........30
Volume Gain.......24
Response..... Entirely to suit your preference for how you want to hear the signal. I mostly use Pitch hold, the easiest to listen to is Normal. the hardest is Smooth.
Number of tones.... Multi normally to give the fullest range of tones. Use the others if you prefer.
Tone ID...... Conduct (best for coin hunting) or Ferrous to suit the user.
Tone Variability.......30 max
Tone Limits............30 max
Threshold PITCH..... 1 very important for maximum variability.
Those are the main settings above.
Going in to the Expert part of the menu is really down to where your detecting and how trashy the ground is.
If in clean ground conditions I would probably set Deep on, Fast off. Trash density low, ground neutral or difficult.
If in some chattery ground I might set Deep off, fast on, Trash density high, ground difficult.
The preference menu is purely personal also.
Pinpoint mode can be chosen to suit yourself.
Hope this all helps a bit.
The setup above is what I use for a nice steady Variable tones programme. Other people have slightly different ways to go.
When you come down to it there are lots of settings on the E Trac and Explorers but very few that actually alter the performance drastically. Basically most of the settings especially in the Audio & tone menus are purely personal.
Try other peoples patterns & programmes on the E Trac Exchange but remember that they probably wont suit the conditions where you detect yourself. Setting up your own using the Quick mask screen and then adding the values that work for you has to be the way to go".
_________________
"Major problem for new E Trac owners is the manual is trying to cope with all sorts of levels of Knowledge and dare I say Intelligence. A good starting point is the Minelab factory preset mode and I would recommend any new owner to stay in that until they work out what all the settings do.
I have just looked at all the factory presets in the table at the back of the handbook and I would be perfectly happy to stay and detect and feel confident that I wouldnt miss much in any of those modes and would recommend any newcomers to do the same.
Everybody's going on about the threshold level being too high at 30. That is the factory preset level and its right in the middle of the scale 1 - 50. It is not too high for normal detecting if not using headphones, when using headphones it can be lowered to say around 15-20 where its just audible. Its there for a reason. If you couldnt hear that hum in the background how are you going to know when your sensitivity is too high. Also when your hum disappears momentarily it means you have just gone over a target thats being rejected. Its telling you all sorts that you need to know
When your sensitivity is set too high your threshold hum starts breaking up and you might even lose it totally. When this happens lower your manual sensitivity until the threshold hum comes back.
THE NEXT STEP TO MAKING YOUR OWN PATTERN UP.
My advice for a newcomer to the E Trac and the next obvious and sensible step after the Factory preset modes is to forget all about preset programmes from other sources even though it might seem a good idea to copy everybody elses because they might have been succesful once with it and found some hammered or staters. Go straight to the Quick mask screen and make your own to suit your style of detecting.
Press the quick mask button on the screen and you will be presented with a clear screen.
Next step decide what level of Ferrous and Conduct screening you want.
Using the navigation arrows on the bottom left start by pressing the right facing arrow three times. This will give you a conduct discrim reading of 3 on the left hand side. You can enter more or less than this but remember small hammered coins start showing from this point onwards. Under 3 will be mostly silver foil.
Next press the up arrow which will start raising the Ferrous black line. I have mine set on 33 which is two presses up from the bottom, the higher you go the more Iron and then good targets you will shut out so be careful. The lower you go the more Iron you will dig so a happy medium needs to be found.
Once you have the screen you want to use press the detect button and the screen will ask you if you want to load this quickmask screen into smart find, say ok.
Now this can be the base screen that you always use and can be also saved away as one of your modes. If you end your detecting session and turn off that screen it will be there again when you restart the next time.
As an addition to the above screen I have incorporated a small nails reject pattern into the corner of my quick mask screen that I made above. This is how I did it.
Once I had made the quick mask screen and pressed the detect button and answered yes to wether I wanted to use it as my Smartfind screen I then went back into the menu under discrimination and scrolled down to SAVE where I placed it into one of the my pattern modes by clicking on the right or left arrow to make it save, I then clicked detect to go back to the main screen.
Deciding I was happy with it I then went back to the discrimination Menu and scrolled down to Edit, this brought up the screen below
From the picture you can see that the top two boxes either side are hilighted black, these are the two modes to use, the one on the left is the small cursor the box on the right is the manual mode which lets you scroll around the screen.
The next stage is to manoever the small cursor down to the bottom right hand corner to begin making your nails pattern. This is where a little bit of practise and playing around comes in. With the cursor in the position where you want to start colouring in your screen press in the accept / reject button and you will notice that one click makes a small black square the next click removes it. By holding this button in while you move the appropriate navigation arrow you can proceed to quickly fill part of a line in with black squares.
By looking at my photo below you can work out roughly how high and how wide this nails reject pattern needs to be or as near as anyway.
Gordon Heritage actually made this nails pattern for me the first day I got my E Trac at the Wantage on Mud rally, thanks mate.
Once you have the screen looking similar to the one in the photo above click Detect button and you will be asked do you want to use it in the smartfind screen, click yes and detect.
You can then return to the Discrim menu and scroll down to save where you can then enter it into another my pattern screen and save it away as before by clicking the right or left navigation arrow. Once saved you can return and detect by simply pressing detect.
When you turn off the E Trac in this mode you will always return to it when you turn on again.
If you lose it you can always find it again in my patterns.
Another little tip, before saving these screens in my patterns make sure that all your other settings are as you want to save them away with that particular pattern.
The finished screen
The next stage for an owner progressing from factory presets is to run through the menu and decide what you want to change things to.
You have your quick mask detecting screen as a base so you want to change each setting in turn.
Sensitivity mode Auto or manual, they are both good. sometimes when the E Trac is unstable I will switch to Auto. you can choose the level of auto you want by pressing the navigation button up or down, It will change the values from +3 to -3, I usually leave mine on +3. Manual sensitivity is the normal way to go probably. this needs setting so that you keep things stable, the threshold hum helps to determine this. I usually try and set mine between 25 and 30 max.
Audio.
The settings below are aimed at giving Variable tone settings so that signals from left to right on the screen start low and rise progressively to a higher pitch. To understand what things sound like lay out a series of coins of different values and types plus some pieces of iron & other bits and bobs.
Threshold Level. Just audible around 15-20
Volume limit........30
Volume Gain.......24
Response..... Entirely to suit your preference for how you want to hear the signal. I mostly use Pitch hold, the easiest to listen to is Normal. the hardest is Smooth.
Number of tones.... Multi normally to give the fullest range of tones. Use the others if you prefer.
Tone ID...... Conduct (best for coin hunting) or Ferrous to suit the user.
Tone Variability.......30 max
Tone Limits............30 max
Threshold PITCH..... 1 very important for maximum variability.
Those are the main settings above.
Going in to the Expert part of the menu is really down to where your detecting and how trashy the ground is.
If in clean ground conditions I would probably set Deep on, Fast off. Trash density low, ground neutral or difficult.
If in some chattery ground I might set Deep off, fast on, Trash density high, ground difficult.
The preference menu is purely personal also.
Pinpoint mode can be chosen to suit yourself.
Hope this all helps a bit.
The setup above is what I use for a nice steady Variable tones programme. Other people have slightly different ways to go.
When you come down to it there are lots of settings on the E Trac and Explorers but very few that actually alter the performance drastically. Basically most of the settings especially in the Audio & tone menus are purely personal.
Try other peoples patterns & programmes on the E Trac Exchange but remember that they probably wont suit the conditions where you detect yourself. Setting up your own using the Quick mask screen and then adding the values that work for you has to be the way to go".
_________________