I'm glad you made the move to photobucket! For some reason the Snapfish shots are reduced on their site. Now, next time you want a real "close-up" shot of a coin, ring or button try this:
Shoot it in macro, in the highest quality with a tripod. No need to get super close. Get the pic(s) from your camera to your Zoombrowser software.
In the browser part of the software, you should have thumbnail pics down at the bottom. When you select one, it should show up (larger) in the center of your browser.
Go to "View" on the menu tool bar at the top of your screen. Select "view actual image" Now your pic should be the only one showing and it will be slightly larger. Ah, but it's really a lot "bigger"! That's because the software automatically fits it to your window (makes it appear smaller) so you can see it all.
Now, go to "edit" and select "trimming image". Your pic will have a centered grayed out box with black resize "handles" on a 4 corners and sides. If you click and hold in the middle of the box you can move the gray area so it's centered over your subject. If you need to, you can click, hold and drag the "handles" to adjust the size of the trim area. When done, select "trim" then "OK".
Now when the pic is next viewed, it'll be a LOT more "magnified" Try it on a coin pic.
There should be a drop down box as you view the pic that will say "fit to window". Open that and choose 25%, 50%, etc. Choose the one you like best and save the pic. When you upload it to Photobucket, that's exactly how it will look.
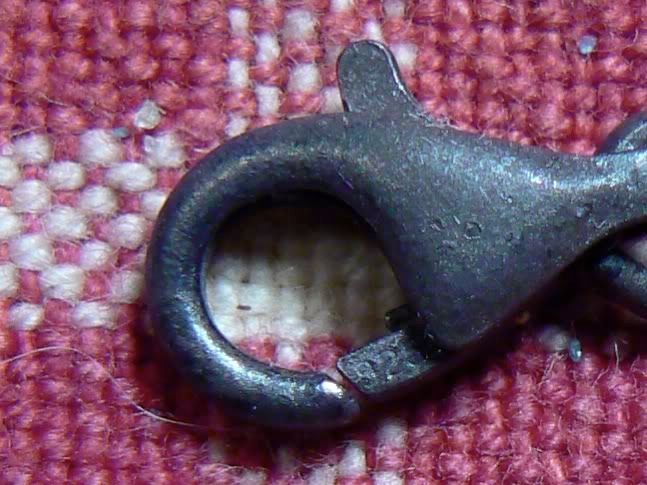
These next two shots are actually of the same pic. The first one was viewed at "fit to window", saved and uploaded to Photobucket
This is from the same exact pic as above, only trimmed to show just the clasp and viewed at "fit to window"
You're almost there Luke! Joeda will teach you the power of the camera "Force"
")
Take care Steve! Hope that helps a little.
Joe