Ed in SoDak
Member
Coils will be coils. Three decades of detecting has at least taught me that much!  I've also noticed that detectable objects might be anything at any depth. Wow, who knew!
What we can't "see" is the energy emitted by our detector's coil, any more than we can view the buried target. It seems to me the real problem is getting the two together in a way we can understand.
Any coil of wire with current flowing in it will have a predictable electromagnetic field surrounding it. It's when an object of unknown composition, orientation and depth enters the picture that the detection field changes. I've tried before to somehow make a coil's detection field visible, the last time was a few years ago where I tried LEDs and time exposures. I got some interesting pictures, but not much else.
My latest attempt is much more useful and I think it might shed some light on how coils respond and maybe help explain some of the iffy ID signals that annoy so many of us on almost any hunt.
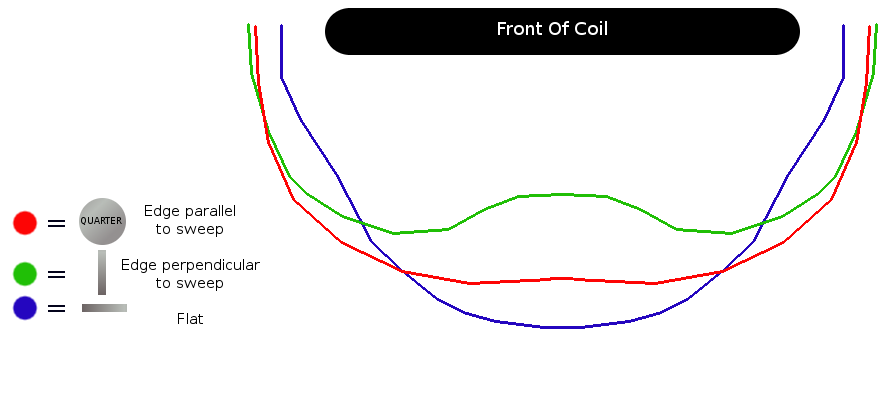
With cardboard and tape, I made a little table which could be attached to the face of a coil. On this I taped a sheet of paper. A quarter was waved at various points. Wherever I got a good, repeatable signal, I made a mark on the paper. As I traced the edges of the detection field, a typical "bell curve" began to appear on the paper.
On a whim, I repeated the test, but with the quarter held vertical to the coil, as if it had been buried on-edge. This pattern was radically different from the nice and even bell curve the flat quarter produced.
Initially, I'd hoped to use the info to draw some comparisons between coils of different sizes. But I think I stumbled onto something much more interesting.
Note in the pics below how far beyond the edges of the coil that a signal is produced and also the pattern in which ID errors appear. To me, this explains how a "false" can occur at the edge of a coil. A shallow coin off to the side might signal just about the same as one buried near 7 or 8 inches deep.
But the coin-on-edge signals are very educational. On the coil sides, an on-edge coin responds somewhat similarly to the flat coin. But as we approach the center of the coil, things change. Detection depth lessens and ID errors increase as the coin enters the middle coil.
Visualizing this field as a circular pattern, it would most closely resemble a donut. The "hot spots" for an on-edge coin are under the main coil's winding, not the center. This may help explain double signals and why some signals are difficult to pinpoint with a solid ID. When you dig a narrow plug, the signal is sometimes found off to the side of your hole. We usually blame our own ability or that of our machine, when it may just be an electromagnetic effect that would happen to any coil in a similar situation.
I've been experimenting with using very short sweeps to ID targets and also "bobbing" the coil up and down over a target. Both seem to be effective techniques to get a more accurate ID and also to center up better on the target itself. Adding the visual image of what's happening beneath the soil is showing me that I'm on the right track.
Using photoshop to enclose my data points, I made a couple images to show the field of an 8" coil on a Land Star detecting a quarter. Green is with the quarter held flat and pink is with it held on-edge. The yellow and orange areas are where I noted ID errors. Not very scientific, but still very interesting!
It's easy to repeat my tests and it was a fun way to while away a hot and humid evening, indoors in the cool AC. If anyone trys it, be sure to post your results here!
-Ed
I've also noticed that detectable objects might be anything at any depth. Wow, who knew! What we can't "see" is the energy emitted by our detector's coil, any more than we can view the buried target. It seems to me the real problem is getting the two together in a way we can understand.
Any coil of wire with current flowing in it will have a predictable electromagnetic field surrounding it. It's when an object of unknown composition, orientation and depth enters the picture that the detection field changes. I've tried before to somehow make a coil's detection field visible, the last time was a few years ago where I tried LEDs and time exposures. I got some interesting pictures, but not much else.
My latest attempt is much more useful and I think it might shed some light on how coils respond and maybe help explain some of the iffy ID signals that annoy so many of us on almost any hunt.
With cardboard and tape, I made a little table which could be attached to the face of a coil. On this I taped a sheet of paper. A quarter was waved at various points. Wherever I got a good, repeatable signal, I made a mark on the paper. As I traced the edges of the detection field, a typical "bell curve" began to appear on the paper.
On a whim, I repeated the test, but with the quarter held vertical to the coil, as if it had been buried on-edge. This pattern was radically different from the nice and even bell curve the flat quarter produced.
Initially, I'd hoped to use the info to draw some comparisons between coils of different sizes. But I think I stumbled onto something much more interesting.
Note in the pics below how far beyond the edges of the coil that a signal is produced and also the pattern in which ID errors appear. To me, this explains how a "false" can occur at the edge of a coil. A shallow coin off to the side might signal just about the same as one buried near 7 or 8 inches deep.
But the coin-on-edge signals are very educational. On the coil sides, an on-edge coin responds somewhat similarly to the flat coin. But as we approach the center of the coil, things change. Detection depth lessens and ID errors increase as the coin enters the middle coil.
Visualizing this field as a circular pattern, it would most closely resemble a donut. The "hot spots" for an on-edge coin are under the main coil's winding, not the center. This may help explain double signals and why some signals are difficult to pinpoint with a solid ID. When you dig a narrow plug, the signal is sometimes found off to the side of your hole. We usually blame our own ability or that of our machine, when it may just be an electromagnetic effect that would happen to any coil in a similar situation.
I've been experimenting with using very short sweeps to ID targets and also "bobbing" the coil up and down over a target. Both seem to be effective techniques to get a more accurate ID and also to center up better on the target itself. Adding the visual image of what's happening beneath the soil is showing me that I'm on the right track.
Using photoshop to enclose my data points, I made a couple images to show the field of an 8" coil on a Land Star detecting a quarter. Green is with the quarter held flat and pink is with it held on-edge. The yellow and orange areas are where I noted ID errors. Not very scientific, but still very interesting!
It's easy to repeat my tests and it was a fun way to while away a hot and humid evening, indoors in the cool AC. If anyone trys it, be sure to post your results here!
-Ed