Find's Treasure Forums

Welcome to Find's Treasure Forums, Guests!

You are viewing this forums as a guest which limits you to read only status.

Only registered members may post stories, questions, classifieds, reply to other posts, contact other members using built in messaging and use many other features found on these forums.

Why not register and join us today? It's free! (We don't share your email addresses with anyone.) We keep email addresses of our users to protect them and others from bad people posting things they shouldn't.

Click here to register!


Need Support Help?

Cannot log in?, click here to have new password emailed to you

Changed email? Forgot to update your account with new email address? Need assistance with something else?, click here to go to Find's Support Form and fill out the form.

Here’s the scoop:

Geologyhound

Well-known member
49C073AE-11E8-4EF9-A377-5A67D26DDC9F.jpeg

Literally, an ice cream scoop…

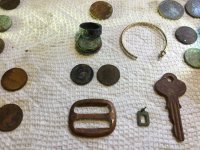
I can’t complain. I went to a “new to me“ local beach. Judging by the parallel tire (equipment) tracks back and forth, lack of foot prints, and cut roots at the edges, the local park had just graded the beach. For some reason, they graded it in a washboard pattern with ridges a foot and a half high and about 4-5 feet wide perpendicular to the shoreline. At the top of the beach, the sand was only an inch or so thick over the top of the gray to black clay. I am guessing they removed about 6 inches of material at least along the edges.

I made one pass close to the shoreline and didn’t find much until I got to the end where I found a wheat penny on the high side in the clay. That got my attention. So I started gridding that end and didn’t find much more until I hit a patch of nails at the grass line. I switched to Tekkna on my D2 and started pulling wheat penny after wheat penny from the nails. They were between about two and six inches into the clay. I was able to find them either along the upper edge of the beach or in the base of each trough. One wheat penny was actually sitting on the top of a ridge about 1 inch down in the sand. I figured the plow must’ve caught the clay and flipped that one out.

With all the wheats (16 total), I figured there had to be silver somewhere. Sure enough, I found a 1960 Rosie and then a 1957. Then I hit a good quarter reading and was hoping for a silver quarter but instead up came a black ring. It is stamped “STERLING” and was right next to the 1951 nickel. That made it a 3-silver day! A one silver day is good in my book. So, maybe I really did get the scoop on things. 😄

As one final surprise, I was looking the pennies over when I got home. I figured they were all 40s and 50s from what I had seen in the field. However where one of the fours should be was actually a one - a 1915! So there may be some older stuff out there too.

What does anybody use to clean that layer of black tarnish off silver?
 

Attachments

  • F8A05837-15ED-4A53-A3B8-2D82FBD73DA3.jpeg
    F8A05837-15ED-4A53-A3B8-2D82FBD73DA3.jpeg
    2.5 MB · Views: 41
View attachment 59924
Literally, an ice cream scoop…

I can’t complain. I went to a “new to me“ local beach. Judging by the parallel tire (equipment) tracks back and forth, lack of foot prints, and cut roots at the edges, the local park had just graded the beach. For some reason, they graded it in a washboard pattern with ridges a foot and a half high and about 4-5 feet wide perpendicular to the shoreline. At the top of the beach, the sand was only an inch or so thick over the top of the gray to black clay. I am guessing they removed about 6 inches of material at least along the edges.

I made one pass close to the shoreline and didn’t find much until I got to the end where I found a wheat penny on the high side in the clay. That got my attention. So I started gridding that end and didn’t find much more until I hit a patch of nails at the grass line. I switched to Tekkna on my D2 and started pulling wheat penny after wheat penny from the nails. They were between about two and six inches into the clay. I was able to find them either along the upper edge of the beach or in the base of each trough. One wheat penny was actually sitting on the top of a ridge about 1 inch down in the sand. I figured the plow must’ve caught the clay and flipped that one out.

With all the wheats (16 total), I figured there had to be silver somewhere. Sure enough, I found a 1960 Rosie and then a 1957. Then I hit a good quarter reading and was hoping for a silver quarter but instead up came a black ring. It is stamped “STERLING” and was right next to the 1951 nickel. That made it a 3-silver day! A one silver day is good in my book. So, maybe I really did get the scoop on things. 😄

As one final surprise, I was looking the pennies over when I got home. I figured they were all 40s and 50s from what I had seen in the field. However where one of the fours should be was actually a one - a 1915! So there may be some older stuff out there too.

What does anybody use to clean that layer of black tarnish off silver?
If it’s just tarnish, I use just white toothpaste. If it’s thick, caked-on minerals, I use a homemade electrolysis contraption to break up the black stuff.
 
Wow great hunt, and I think I know where you were, if is the same place I've hit six golds there in the last year, and probably more then 75 silvers counting rings and coins, keep hitting it I might see you there
Impressive haul!

I went back last evening for about an hour before my coil went dead. I hadn’t charged it after about 4-5 hours use, so I figured I should have several hours left. Sadly not…. No other finds of note.

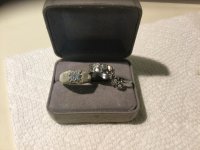
Someone else suggested Mother’s mag polish and a dremel polish pad. My pad did not get down into the crevices of the sterling ring (let alone inside), but the black background sort of accentuates the raised pattern now.

I also tried the polish on another ring I recently found. It is stamped FZ .925 PC and has a single stone. It cleaned the black out of the textured cut on the shoulders nicely. The third ring in the picture is stamped RSC, and must be a kids ring based on the size. I found it in the same place as the one with the stone. Sadly the stones did not test as diamonds. A final clean and rinse in a sonic cleaner and they look nice, though!

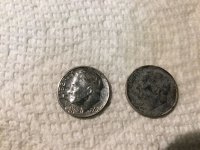
Just for the fun of it, I buffed the two black dimes with the polish. One shined up (probably a bit too much). For the other one, I couldn’t cut through the crust. I know cleaned coins are not worth much, but neither are tar black coins. These were not key dates, so I figured I would rather have shiny coins worth silver value instead of black coins worth silver value.
 
If it’s just tarnish, I use just white toothpaste. If it’s thick, caked-on minerals, I use a homemade electrolysis contraption to break up the black stuff.
I tried that first, and it did not cut through the black. I don’t have an electrolysis kit, so I tried a dremel with a buffing pad and some Mother’s Mag Polish. That mostly worked (see pics in earlier response). However, even that would not cut through the crust on the face of one of the dimes.
 
Good on the wheats and silvers. Try a wet q tip and a dab of baking soda. Just rub the soda around gently with the q tip. HH Jim tn
I will have to try that in the crevices. I also wonder about a clipped down Q-tip with polish compound in a dremel, as I don’t currently have any dremel pads small enough to get inside rings or in crevices.
 
Looks like that scoop has some age to it! Nice digs on the silver also, I've used Mothers on stained Gold n Silver and a hammer on crusty silvers. Since I melt all my silver Im not to worried about the after condition.
 
Top